This is a Sponsored post written by me on behalf of FrogTape. All opinions are 100% mine.
Have you ever wanted to paint a design on your walls but after you were done you noticed the paint bled or the lines didn’t look good because your walls were textured? I cannot tell you how many times I’ve tried this in the past but finally gave up because textured walls just didn’t work right with painters tape. Thanks to Frog Tape® you can now paint perfect lines on your walls and there is no bleeding whatsoever!!
I have been wanting to paint my son’s wall for a while now but we had kind of given up because the walls are so textured, and we decided on just a solid color. Then we found Textured Surface by FrogTape® and decided to give it a try! FrogTape® is treated with PaintBlock® technology, a super absorbent polymer that reacts with the water in latex paint and instantly gels to form a micro-barrier that seals the edges of the tape, which helps to prevent paint bleed! That means no matter what type of texture your walls are, now you can paint perfectly straight lines!
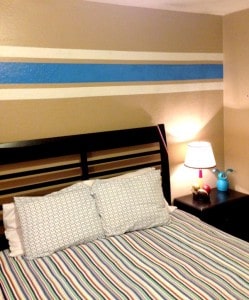
Here is the wall we decided to paint. As you can see, it’s a very textured wall!! We began by creating a starting point to tape. Our starting point was 16 inches from the ceiling. We measured 16 inches from the ceiling and made a light mark as my first point. We kept measuring and making marks every 12-24 inches. (you will be able to see a few of those marks in the photos below) Once we had made all of our marks, we unrolled the FrogTape® so that the bottom edge of the tape just touched the pencil marks that we had made. I ran my finger down the edges of the Frog Tape® and then ran an old debit card along the edge to assure a tight bond between the tape and the wall.
We took another measurement of 3 1/2 inches from the bottom of the FrogTape® we had already put up following the same steps we did for the first strip of tape. The two pieces of FrogTape® that were now on the wall would be for the top paint stripe.
Then we measured 6 inches from the bottom of the lowest piece of FrogTape® and made pencil marks. We ran one more piece of tape and measured 3 1/2 inches below that strip to make the new points.
We finished the last piece of FrogTape® and smoothed out all of the edges as tightly as possible with our fingers and the old debit card.
When we were done we had total of 4 lines of FrogTape® on the wall. This allowed us to have an upper stripe of 3 1/2 inches, a 1 1/2 inch stripe (that is the original wall color that the tape is covering), a 6 inch strip, another 1 1/2 inch strip of original wall color that the FrogTape® was covering, and a final 3 1/2 inch strip.
We used a lightly damp cloth to moisten the FrogTape® as per manufacturers recommendations to activate the PaintBlock® technology. This locks the edge to prevent paint from running under the tape’s edge. We let the moisture of the damp cloth dry (no more than a minute) and then applied the Liquid PaintBlock® edge sealer to all edges that would be painted.
We allowed this to dry for 15 minutes and then painted the top and bottom lines with a white paint with one coat of paint.
We painted the blue with one coat as well.
We then checked to make sure that we had proper paint coverage and immediately removed the tape before the paint was dry.
I have painted many walls with this same texture to it and tried many types of tape/techniques that promise “perfect” lines. Unfortunately, I have not been able to get lines that met my expectations. After using the textured wall FrogTape® kit, I will never use anything else!! It was very easy to use and gave me beautiful lines/edges with little to no effort. Check out the lines close up!!
